Milestone 0: Setting up the bricks
Before you start playing the game, you need to set up the various pieces. Thus, it makes sense to call a function to set up the game before you create the timer that starts the animation. An important part of the setup consists of creating the rows of bricks at the top of the game, which should resemble Figure 1}.
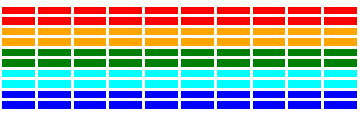
The number, dimensions, and spacing of the bricks are specified using constants in the starter file, as is the distance from the top of the window to the first line of bricks. The only value you need to compute is the x coordinate of the first column, which should be chosen so that the bricks are centered in the window, with the leftover space evenly divided between the left and right sides. The colors of the bricks remain constant for two rows and run in the following rainbow-like sequence: "Red", "Orange", "Green", "Cyan", and "Blue". If you change the definition of N_ROWS in the starter file, any additional rows should simply repeat this sequence, starting over from "Red".
This part of the project will rely largely on constructing the proper loops and getting the spacing worked out. Don’t be afraid to sketch out distances and dimensions on a sheet of paper to help you get the necessary spacing. You’ve also done something very similar in creating the pyramid of bricks on PS4, so do not be afraid to look back at how you approached things there!
As a suggestion, try to have this part of the program working by the end of Tuesday. That would have you displaying most of what you see on the final screen, and give you confidence that you can get the rest done. And that ensures you are well on your way before time gets short.